iOS Variant
The following step-by-step guide gives you an introduction on how to use the AeroGear UnifiedPush Server for sending Push Notifications to your own iOS Apps. The guide assumes you have an Apple developer account already setup, and uses tools available in macOS.
To be able to send push notifications to iOS, an iOS variant must be created. That variant can be an iOS (Certificate) Variant or an _iOS (APNS Token) Variant, depending on the way we are going to authenticate to the APNs:
- with an APNs Certificate
- with an APNs Token
The first one is the legacy one: with this method you will be required to have one certificate for each application and, furthermore, you need two distinct certificates for the production and the development environments.
The second one is the new token based authentication, which makes authentication much simpler:
- The same key can be used for both development and production environments
- The same key can be used for all the apps registered into your developer account
- The key does not expire
In this manual we will describe how to use both the approaches.
APNs Certificate authentication
A couple of configuration steps needs to be performed on the Apple developer site before we can create the actual variant in the Unified Push Server:
- Create a CSR (Certificate Signing Request): this will be used to ask apple to generate a development and/or production certificate
- Create an App ID and its SSL certificate: this will be used to authenticate the application to the APNs
Certificate Signing Request
First you need to submit a request for a new digital certificate, which is based on a public/private key. The Certificate itself is acting as the public key, and when you request it, a private key is added to your KeyChain tool. The Cerficate will be used later on, to request an SSL certificate for the Apple Push Network service, which will allow the AeroGear Push Server to send notification messages to it. Now the actual CSR (Certificate Signing Request) is done using KeyChain Access found in the Applications > Utilities folder on your Mac. Once opened, in the KeyChain Access menu, choose Certificate Assistant > Request a Certificate from a Certificate Authority:

Make sure that you have chosen "Saved to disk" to save the CSR locally; we will upload it later in the provisioning portal when requesting the actual SSL cert. Going back to KeyChain Access you now see a new private key:

Apple App ID and SSL certificate for APNs
Now that the CSR is generated, go to the Provisioning Portal and log in with your Apple developer account. Now, click on the Identifiers link in order to create a new App ID (use the PLUS Icon on the right). In the window that will appear, select App IDs
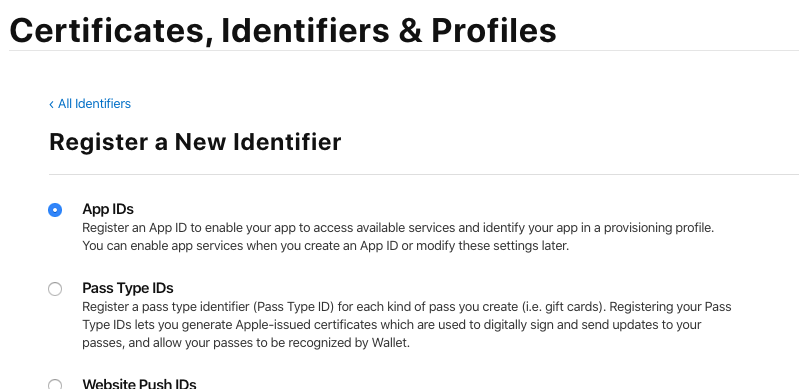
Click on continue. In the form that will appear:
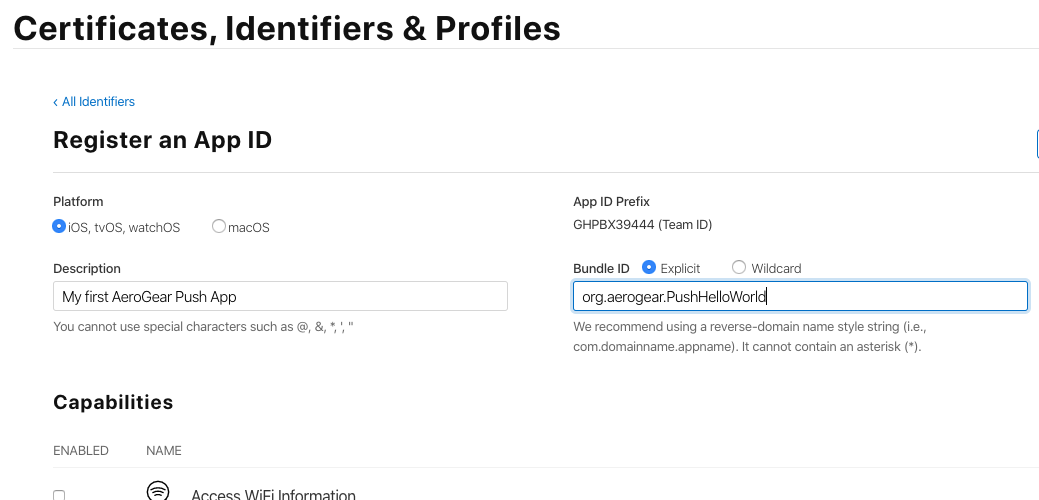
- select iOS, tvOS, watchOS, give the App ID a descriptive name, like My first AeroGear Push App
- select Bundle ID Explicit (generic Wildcard App ID does not work with Push)
- In the Bundle ID field enter YOUR bundle ID. This is similar to Java packages. In this example we choose org.aerogear.PushHelloWorld, however you must use your own ID
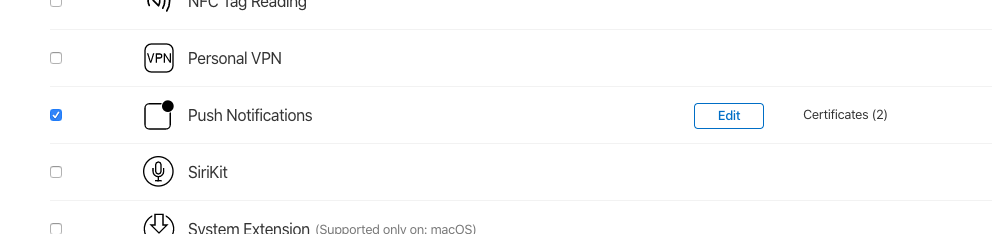
- Double check that the Push Notifications checkbox is selected in the list of Capabilities:
note
The Bundle ID has to match the one from the actual iOS application that you are building later in this guide.
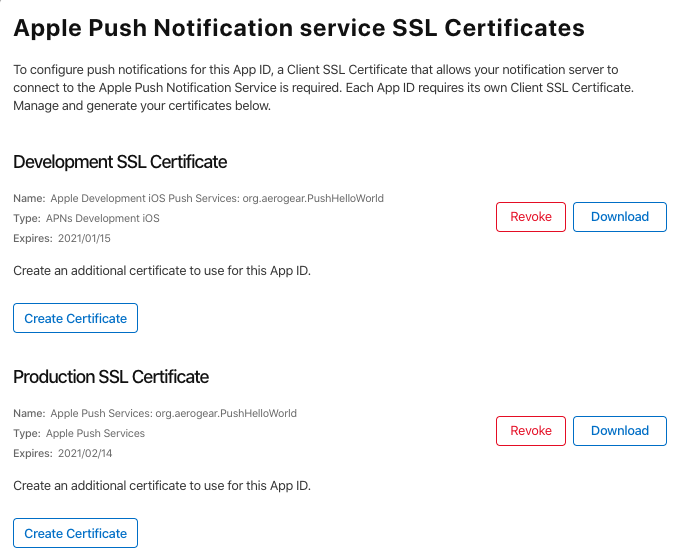
In the next screen confirm your new App ID, and double check that the Push Notifications option is enabled. Afterwards click the Register button! Then, click on on the newly created App ID, and ensure that the Push Notifications capability is enable and click on the Configure button close to that. The following screen will appear:
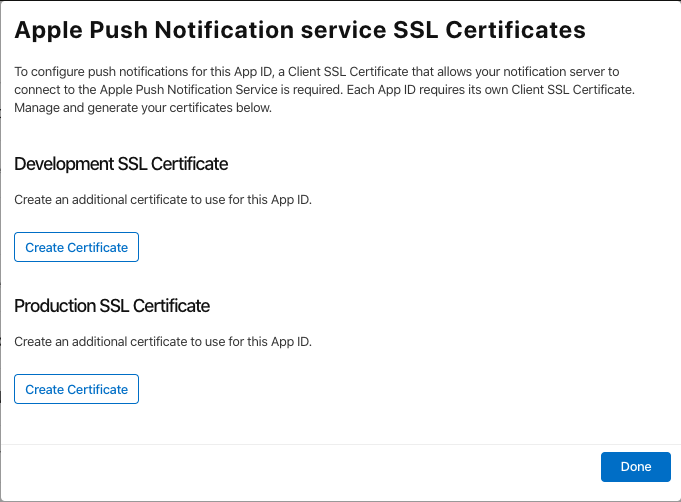
Here we are asked to generate a Development and a Production certificate that will be used by the UnifiedPush server when contacting the Apple Push Notification service to send messages. If you plan to distribute your app in the App Store, you are required to generate a Production certificate. In this guide we will generate both Certificates and register them with the UnifiedPush server.
Let’s start first by generating the Development Certificate. Click the Create Certificate button on the Development SSL Certificate section:
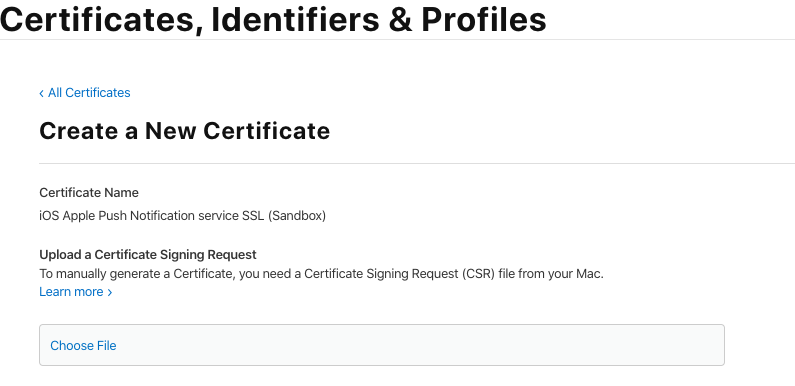
Choose the Certificate Signing Request you generate before and click on Continue: that will sign your certificate request and will give you the chance to download your newly generated certificate.
By following the same steps as before, you can now generate a production certificate too.
Now, if you go to your identifier, the Push Notifications capability will appear as below:
Click on Edit:
Download and install the certificate (double click on it and choose login as keychain)
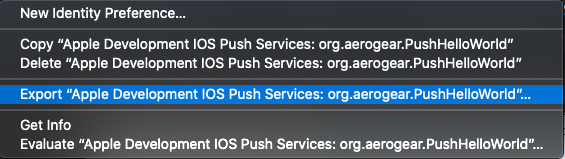
Open the KeyChain an select the login keychain and the My Certificates category:

Now you have to export this certificate/private key pair as Personal Information Exchange (.p12). This file will be uploaded later on to the AeroGear Push Server enabling it to authorize itself for your development application on Apple Push Network Service and send messages to it.
When exporting the file you need to assign a passphrase that will protect the private key. Make note of the passphrase, because later when uploading the private key to the AeroGear Push Server you will need both the exported file and the passphrase.
Follow the same steps to download the Production SSL Certificate, the file is being downloaded as aps_production.cer. This file will be uploaded later on to the AeroGear Push Server enabling it to authorize itself for your production application on Apple Push Network Service and send messages to it.
Creating the variant in the UnifiedPush Server
APNs is now configured and we are now ready to setup the UnifiedPush Server to connect to APNs and send push messages.
In the Wizard after you create a PushApplication, click the Add Variant button and fill out the iOS option. You will want to use the certificate and passphrase you create earlier:
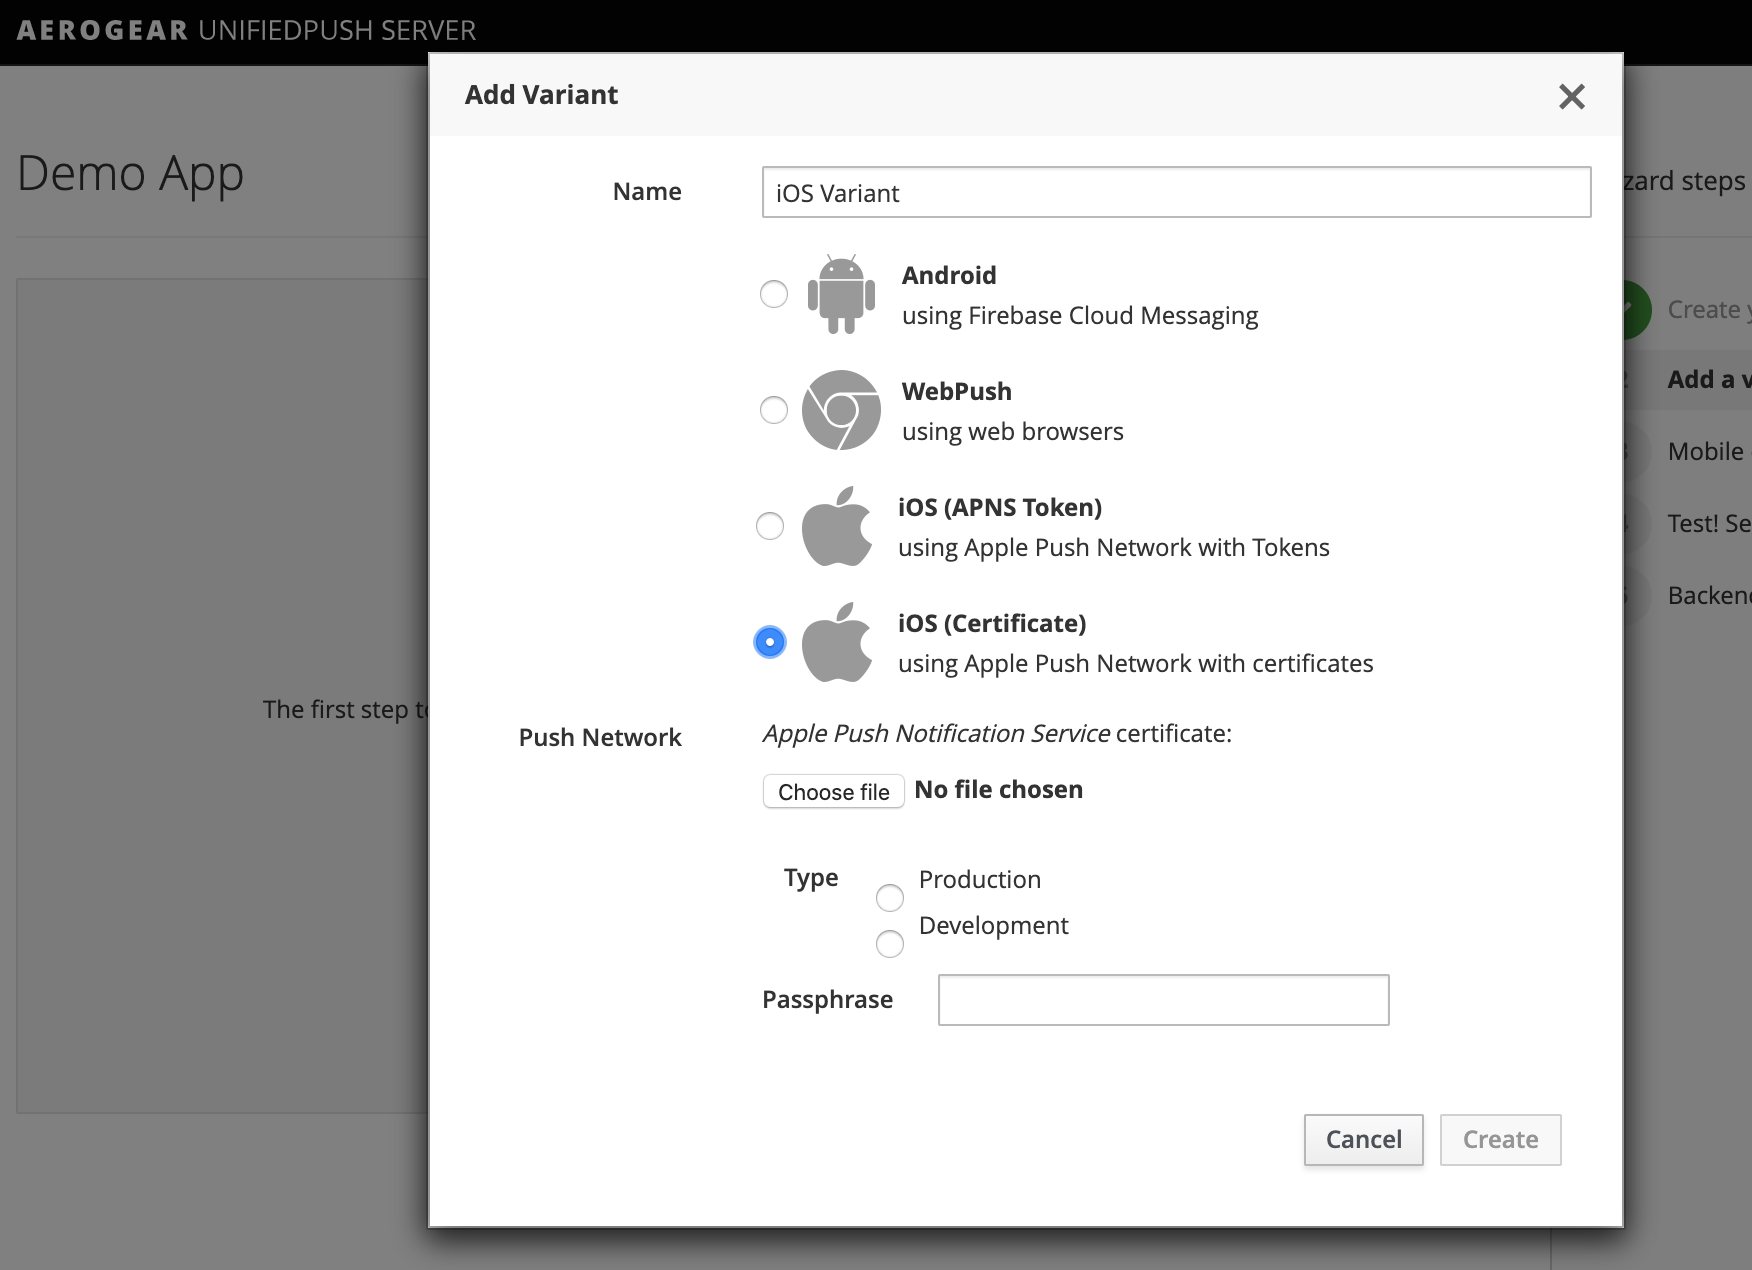
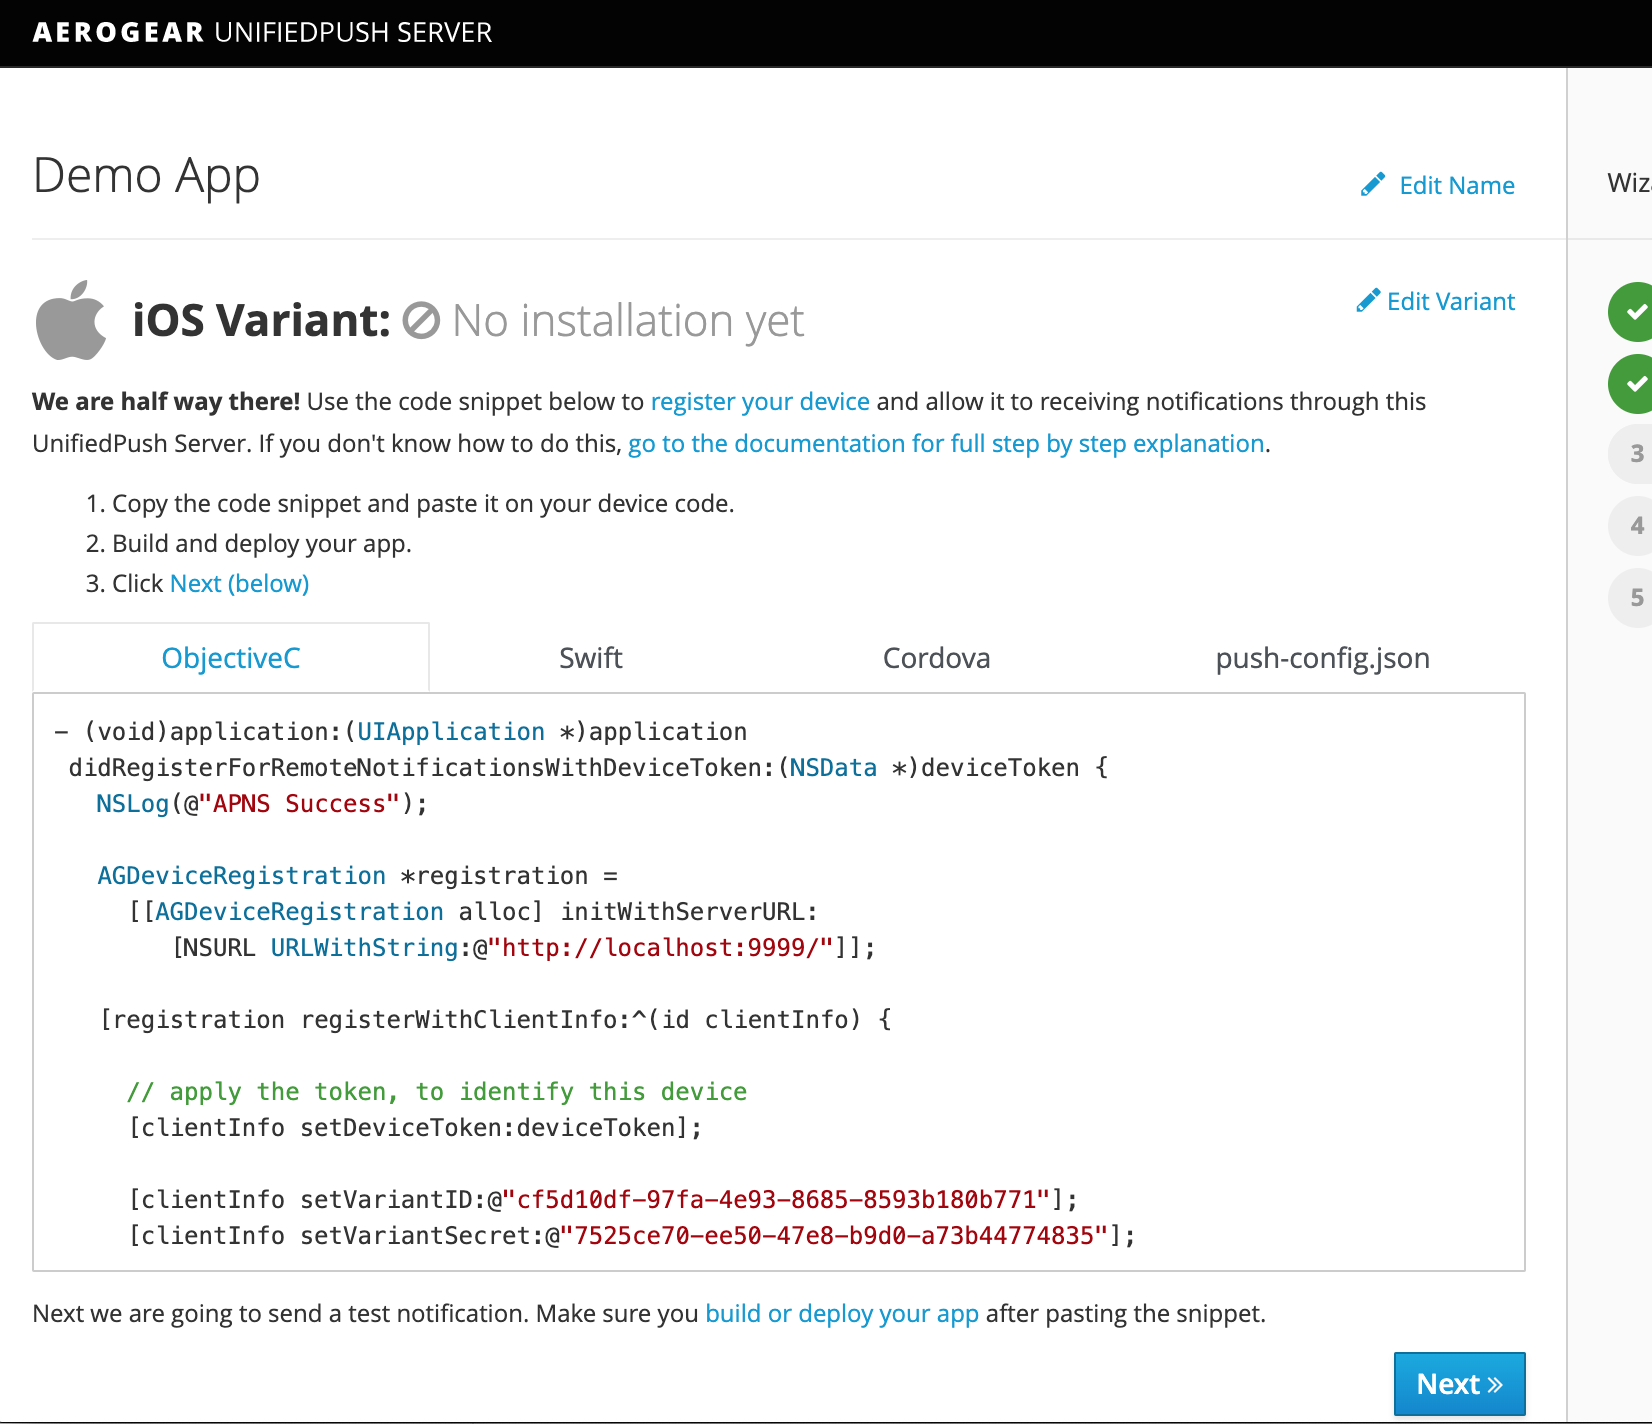
Afterwards you will see some code snippets containing the Variant ID and Secret that you can use in your iOS application for registering the device when running your app:
note
Clicking on the appropriate tab, you can choose between Objective-C, Swift and Cordova snippet |
APNs Token Authentication
To be able to authentication using token authentication you will need to collect the following informations:
- your bundle id: This is similar to Java packages. In this example we choose org.aerogear.PushHelloWorld, however you must use your own ID
- your team ID
- your private key
- your key id
The TEAM ID
Your Team ID can be obtained very easily form your developer account:
- Enter your development account
- Click on Certificates, IDs & Profiles
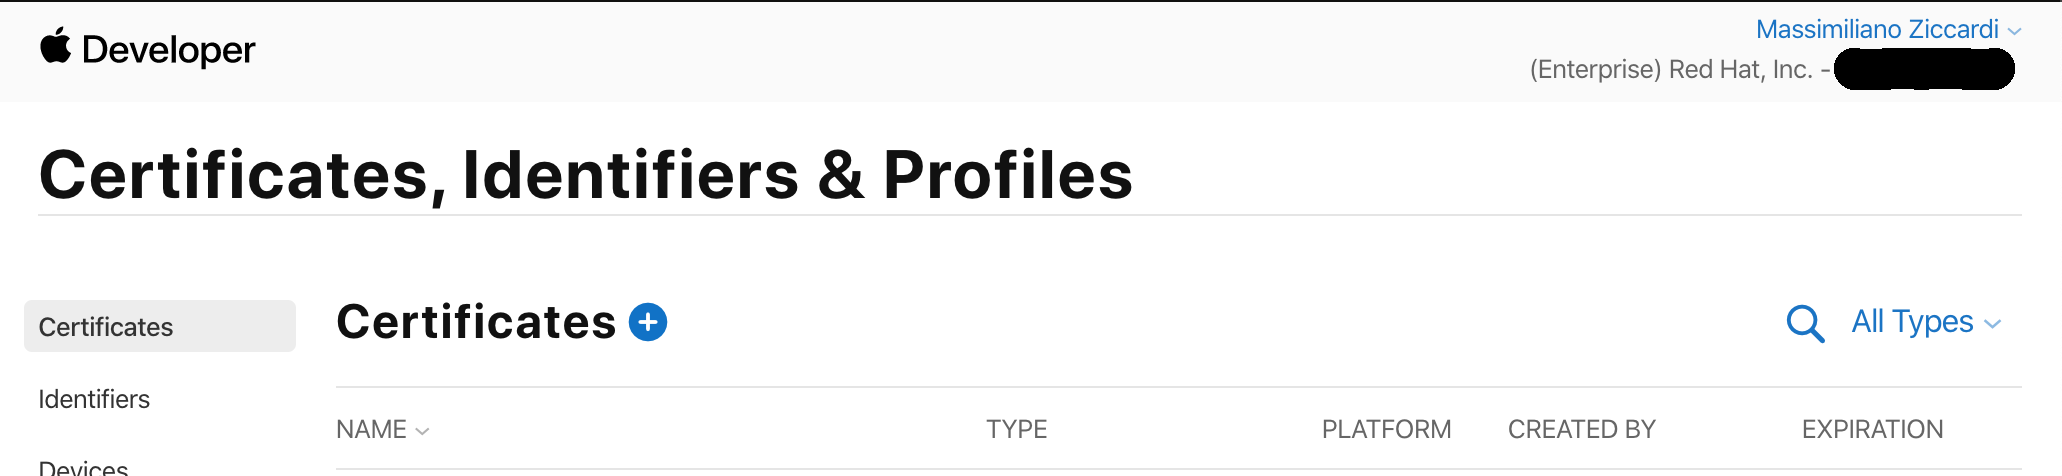
Your team id will be on the upper right corner, right below your name, next to your team name.
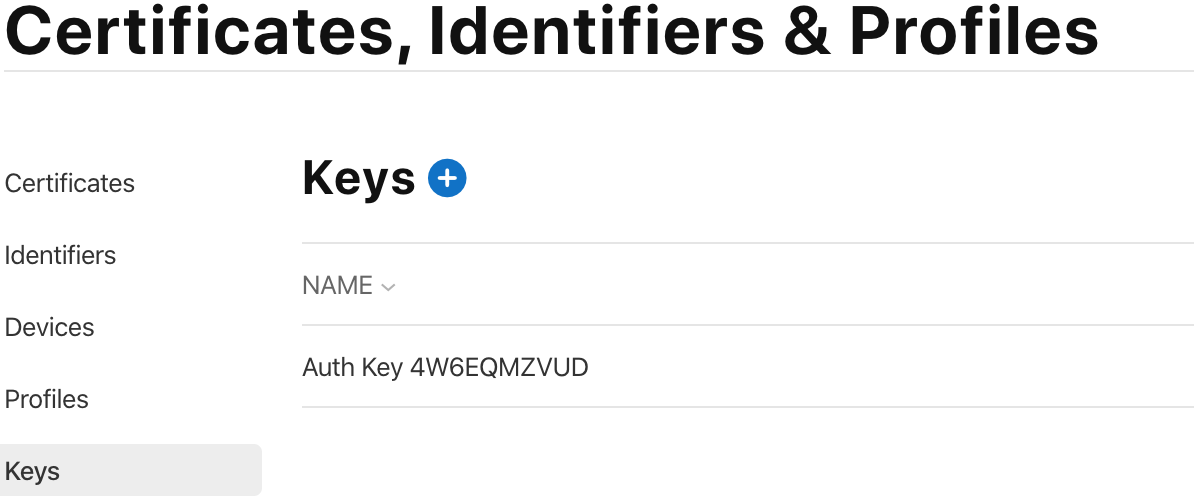
Generating the private key and the Key ID
As for the team id, go to the Certificates, IDs & Profiles page. Once there click Keys to go the keys management page and click on the plus sign at the right of the keys header:
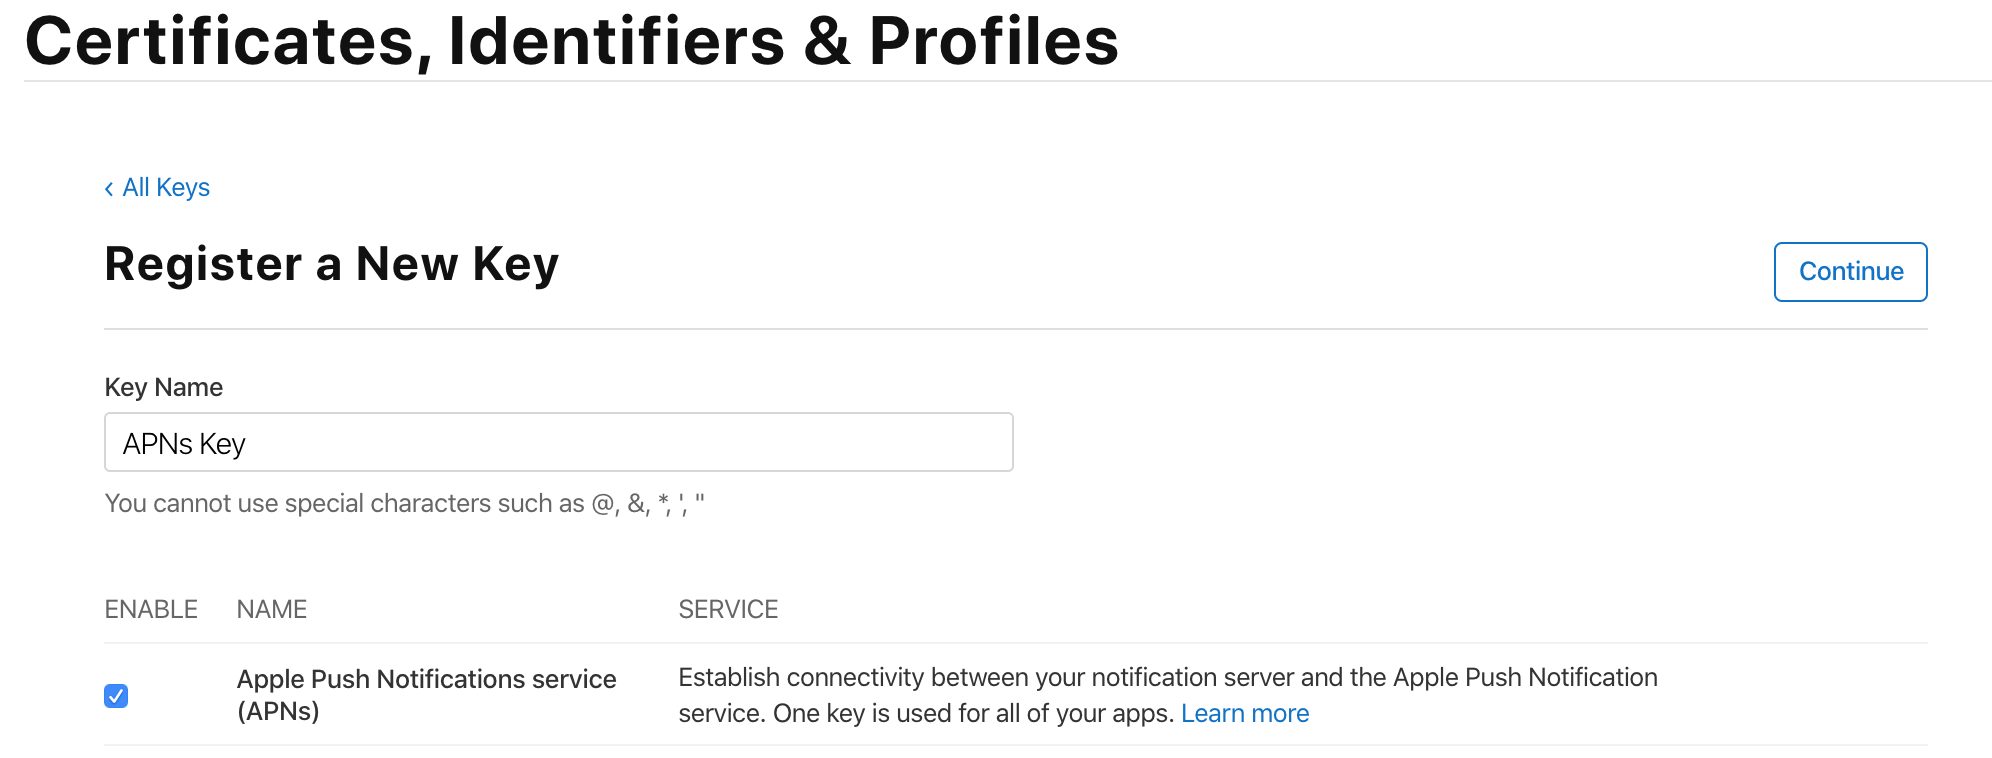
That will lead to a form where you will be able to set a name for the key and select the feature to enable.
important
Double check that Apple Push Notifications service (APNs) is enabled here!
We are almost done: click on Continue and then on Register. That will bring you to a screen similar to the one below.
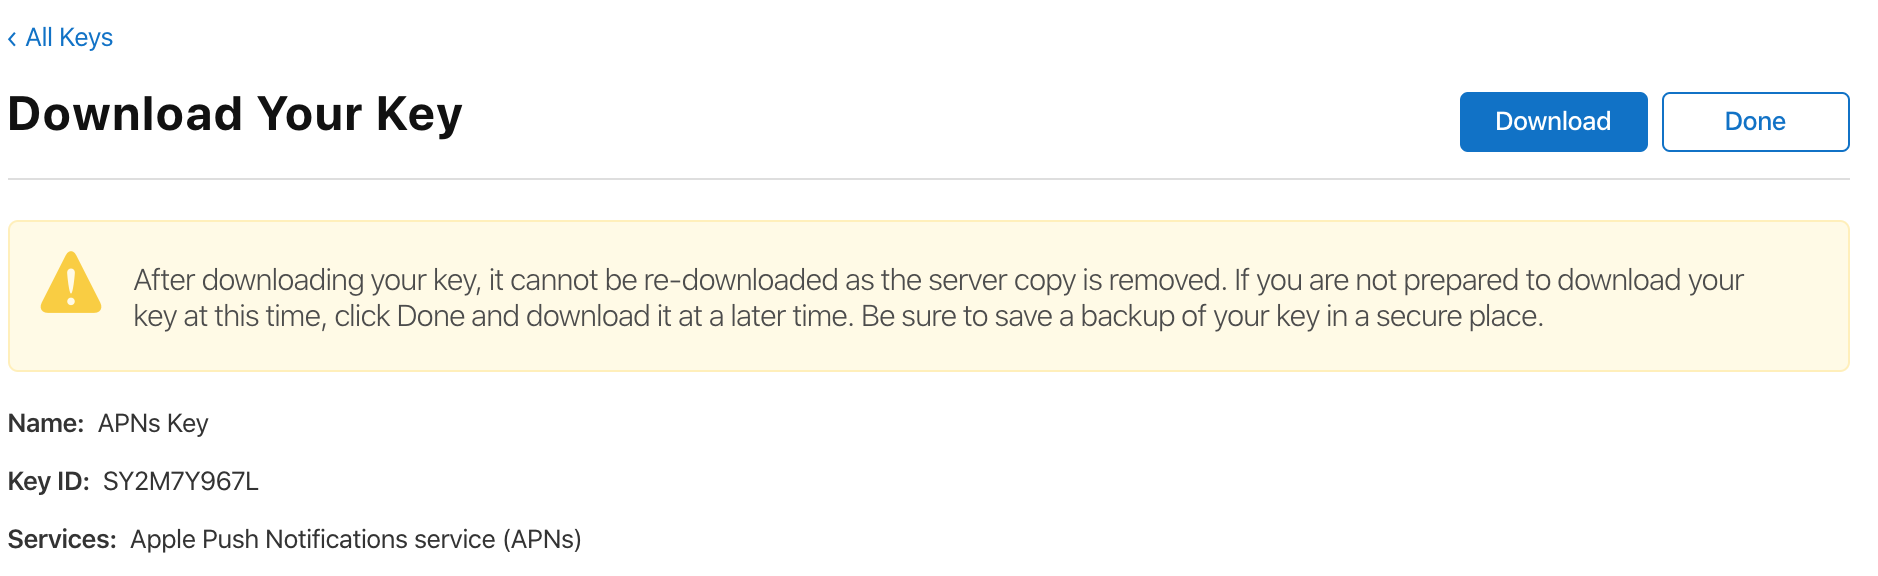
Take note of the Key ID and click on Download to save the key somewhere, since we will need it to create the variant.
warning
Please, take care of the downloaded key, since, after you click on download you won't be able to download it again!
Creating the variant in the UnifiedPush Server
APNs is now configured and we are now ready to setup the UnifiedPush Server to connect to APNs and send push messages.
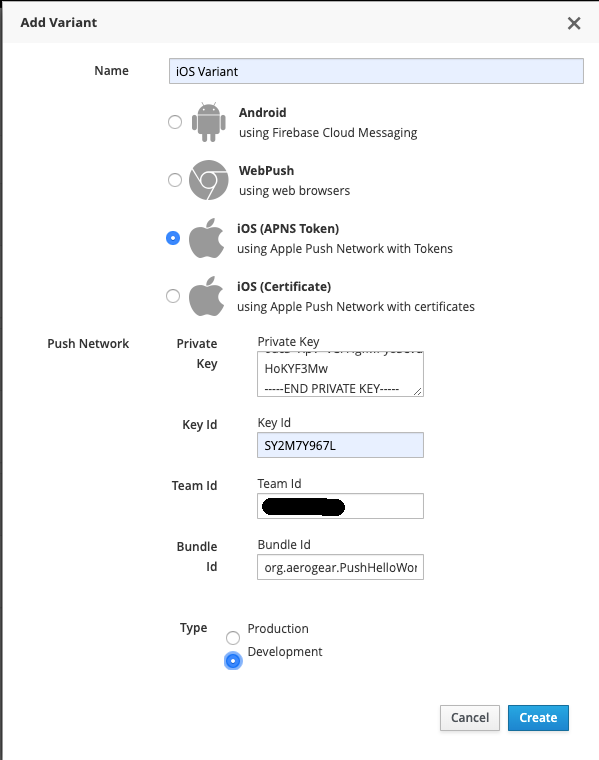
In the Wizard after you create a PushApplication, click the Add Variant button and select iOS (APNS Token). You will need the private key you just downloaded, its key id, your team id and your bundle id
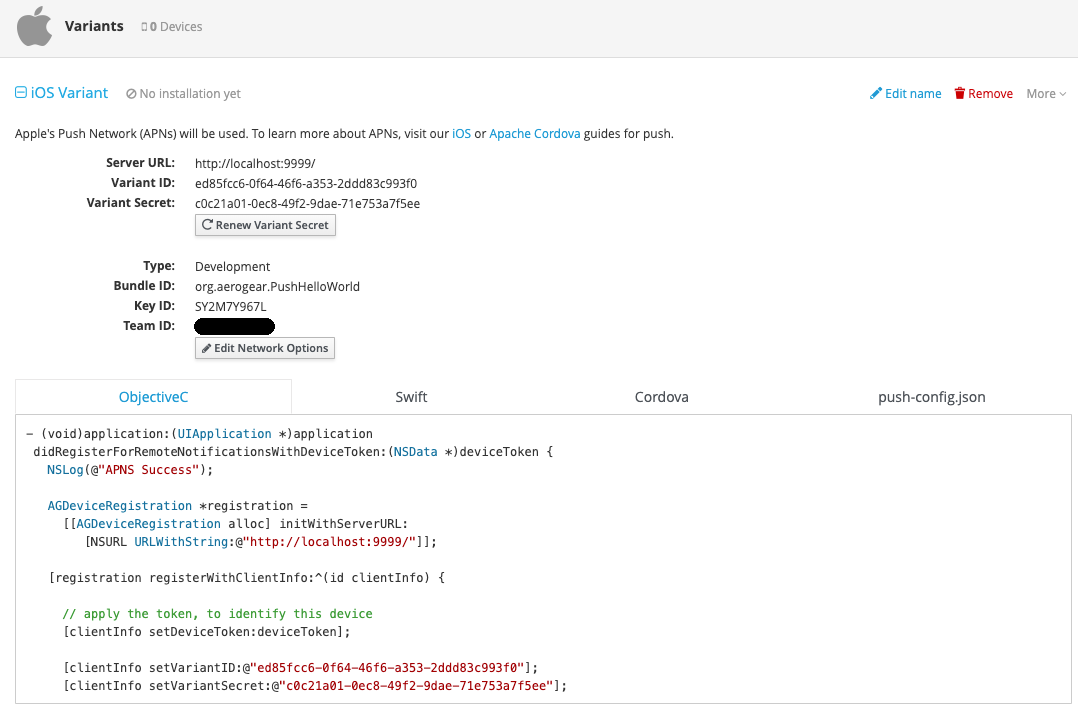
Afterwards you will see some code snippets containing the Variant ID and Secret that you can use in your iOS application for registering the device when running your app:
note
Clicking on the appropriate tab, you can choose between Objective-C, Swift and Cordova snippet |